Wednesday, December 14, 2011

Review of Processing Books

It has been quite quiet here lately. Not because I have abandoned this blog, but because I have spent numerous hours and nights learning to program with  Processing (www.processing.org).

Reason for this has been a project named as UNUI.

 UNUI is an improvisation project by voice/sound artist Aava Uusikuu, visual artist Outi Aho and sound editor Jouni Korhonen. "Unui" is a word of an imaginary ancient language. It is some kind of glossolalia, enjoyable movement of a mouth without closed meaning. Live shows contain visual structures, organic soundscapes and affective human cries, murmurs, mumbling, babbling, singing and speaking weird languages. Each performance is different, because the song, sound and visual elements are generated during the presentation. (https://www.facebook.com/#!/pages/Unui/188416394512662?sk=info)
My role has been to provide the interactive visual improvisation for the presentation.  I have used my drawings, paintings and photographs as the source of visual material. During the show, this material is animated, combined and manipulated both by the computer (based on the improvised sound)  and by myself .

I wanted to program the software by myself.  I selected Processing, because I already knew some basics of it due to fact that it is used in conjunction with arduino. I did study other possibilites also (such as PureData and VVV) but I decided to use processing because I already have some basic knowledge of C and C++ .Otherwise I didn´t knew anything about graphical capabilities of the Processing or Java.  

As an incurable book-a-holic. I decided to buy several Processing books to support my learning path. Actually I bought four of them. I do not regret buying any of those because all of the have special unique merits. Below some of my feelings related to those books.

Getting Started with Processing, Casey Reas & Ben Fry, 2010
This small booklet (194 pages) is a good and a very quick starting point to learn and understand Processing. I went through the whole book and all examples just using two days. After that I had a confidence that I can start my part of the UNUI project with Processing. The book is concise and explains the basics very thoroughly and clearly. I could have even managed to do my program only by using this book and the Processing web side if I would have more time. However, I wanted to have some kind of paper manual also for quick reference. So I bought also:

Processing, A programming Handbook for Visual Designers and Artist, , Casey Reas & Ben Fry, 2007
This book is what is says to be - a Handbookwith a capital letter. It has 710 pages full of information and examples. This book works well if I need to check some basic things. I also like that the book contains information about actual Art projects and interviews of the Artists. I also like that this book has hard covers which make it easy to use it as a "bed-time reading book".  The minuses are that the book has rarely any color pictures.

Processing for Visual Artists, Andrew Glassner, 2010
I admit, that I bought this book mainly due to its cover picture that somehow appealed to me. I also liked that the book has plenty of color pictures and a lot of visually interesting projects. What I have liked about this book is that it explains also a lot of principles of computer generated graphics and image processing. Examples are well thought over and the book proceeds  in a iterative way from easy to more complicated examples. What I don't personally like is that the text has been written in a very chitchatting way.  I have not yet went though all examples, but I have been planning to do it soon. The minuses are that the book has soft covers and glued quite poorly.  I am afraid the pages will fall off very soon.

Learning Processing, A Beginner´s Guide to Programming Images, Animation, and Interaction, Daniel Shiffman, 2008
I bought this book because I first found the coding examples of the book  from the web. They seemed to be very interesting and useful  for me. Also I liked that the book also covered some examples about Video and Sound processing. The book is intended to be used as text book for introductory level programming course. Therefore the structure of the book is organized as lessons with related exercises and small projects. The book is maybe too basic for me, but as I already mentioned, examples are great. I also liked that the author did talk something about Java, too.

Monday, August 1, 2011

How to program Arduino Mini without Mini USB adapter

I am using Arduino Mini ( http://www.arduino.cc/en/Main/ArduinoBoardMini) in my ongoing project.
Therefore I bought the device together with Mini USB Adapter.

Only after I had received both gadgets by mail, I started to study how I can program Arduino Mini  (http://arduino.cc/en/Guide/ArduinoMini).

I have thought that I could easily connect the Mini USB adapter directly to Arduino Mini. I soon realized that connecting these devices together was not so easy after all.

If I would liked to use the Arduino Mini adapter, I should use protoboard and wire correct signal to correct ports with jump wires. OK, that is not so difficult, but I am a lazy lady and do not want to do simple things over and over again.

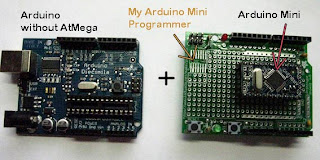
I noticed that I could actually connect Arduino Mini to regular Arduino by just removing the ATmega chip from some old arduino board (as Arduino Mini Guide instructs).

I already had made this kind of "stripped" Arduino in oder to program my Arduino XBee shields. In this kind of set-up I would still need to use the protoboard and make the wiring. Ripping the Arduino Mini out from the protoboard every time I would like to test it in real application was not a very fascinating idea.

Then I got a great idea. Why not make my own Arduino Mini programmer!!!

I already had one unused protoshield. I just soldered  12 -pin sockets on top of it. After that  I connected all necessary signals to correct places in the protoshield so that I could stack the modified protoboard on top of the "stripped" Arduino board.


Thats it. Good ideas are very simple. No need to fuss with protoboards and wires at all.


I have three Arduino boards stacked to top of each other: "stripped Arduino" + my Arduino Mini programmer + Arduino Mini.

Now I just need to remember which way I have to connect the Arduino Mini to my programmer. Nice feature is also that I have the reset button easily available on top of the "Arduino Mini programmer".

I also connected all inputs and outputs of the protoshield to Arduino Mini sockets expanding the  "Arduino Mini programmer" to be "Arduino Mini programmer + SW testing board" :-)

Tuesday, July 19, 2011

How to connect Flex Sensor to Arduino

I have been working on my new artproject in which I will use Flex Sensor as "a switch" to change the track of a Mp3 player. Flex Sensor and the MP3 player are both connected to the arduino, that controls the action.

Flex sensors are sensors that change in resistance depending how much the sensor is bend. Sensors convert the change in bend to electrical resistance - the more the sensor bend, the higher is the resistance value.

Using the Flex Sensor is very easy. There are couple of different manufacturers in the market.
I used the 4.5" long from SpectraSymbol. Their datasheet is very clear and informative (http://www.sparkfun.com/datasheets/Sensors/Flex/FLEXSENSOR(REVA1).pdf).

Datasheet instructs you to use operational amplifier (opamps). That may be useful if you plan to use flex sensor as stand-alone device (without any microcontroller). Because I am using arduino, I skipped all OpAmps and made a very simple circuit with only one additional resistor.


Varying the value of the resistor will results different readings. With 22k Ohm resisor I will get values between 300-700. This works fine for me. In my code I assume that all values under 400 mean that the sensor is bend. All values above 600 mean that sensor is nor bend. Note that Flex sensor give reliable readingsONLY if you bend it on the specific direction (usually towards on the text side of the sensor).

I have not yet integrated the sensor to final artwork, so I do not have any world of warnings of my own. I have played with the sensor in the protoboard without any problems. (Legs of the connectors fit nicely to protoboard.)


The most fragile part of the sensor seems to be near the connector legs. I think it would be wise try to avoid any substantial bend on that area. I might protect that area with some sort of plastic encasing.

Saturday, May 28, 2011

Tinkering Loudspeakers

It has been quite a while here in this blog lately, but it does not mean that nothing is happening.

I am working on an interesting performance project with a singer and a sound recorder. This performance requires quite expensive equipment, so we need to get external support for financing before we can continue further. However, this project has made me study more deeply programming languages such as Processing, VVVV and Pure Data.

In the mean time I have continued in my other project where I will make "an audiobook" of my own. For this project I need to have loudspeakers that are as flat as possible. This has proven to be quite difficult task.

Passive speakers as such are not a good option, because Arduino (+ Mp3 player) will not be able to feed enough power to them. You can get some signal out, but the sound is so silent that it is practically useless. I tested several passive speakers with Arduino/MP3Trigger and the results were poor. Therefore I needed to have some kind of powered amplifier to get reasonable loud sound out of the system.

I could have tried to make a powered amplifier by myself, but it would not be flat enough for my purposes. Then I finally remembered that what I need was actually already  in my storage !! Cheap, ready-made speakers intended for MP3 players.

I had bought some HAMA loudspeakers couple of years ago. At that time, I was not satisfied them, because they were too bulky. Because I was not using them, I though it does not matter if I broke one down to see if there is something useful inside.


And there was everything what I needed: a very small and neat power amplifier and quite flat loudspeakers!! I just needed to remove one led (only indicating that the device was powered).  I also modified the circuit so that the device is always on if the external power is connected. I got what I wanted easily and much cheaper than if a have bought parts and build everything from scratch (HAMA loudspeakers costed about 10 €)

The lessons learned could be that tinkering your old useless gadgets might be more worthwhile that buying new stuff.


p.s. While looking for some help from internet, I found interesting link that showed how to make very flat loudspeaker from fabric. Although they are not very practical to my "audiobook" project, I will definitely try making my fabric speakers in the near future.

Monday, January 10, 2011

The most stupid Arduino mistakes I have made

Lets face it! There are stupid mistakes, and most of them are repeated time after time. At least I do it !

Luckily you will gradually learn to check the most common causes before panicing and causing more severe mistakes than the original one. Here are a list of the most common and "stupid" problems I have faced while working with Arduino.

ARDUINO

Actually I have been lucky and I have never broke any arduino board by causing short circuits  etc. I think the reason is that I am always using RED wire for the power and BLACK wire to the ground. And I never ever use these wires to connect data ports. 

I have also learned to CONNECT FIRST ALL GROUND WIRES before connecting anything else.  Possibility to have some kind of voltage peaks while connecting the circuit to the power source is diminished.


One weird error happened once with my robot - it started to move by itself when I put my hand near it!!

It took some time to figure out the reason. My robots have two arduino board that are connected together. The first arduino was controlling the motors and the second one was handling all the communications and data from sensors. Obviously the data signal that commanded first arduino to steer motors was floating. When I approached the robot, the state of that data signal changed due to my capacitive load I was introducing to the circuit.

The reason was naturally as simple as that these two aduino boards did not had a common ground. The correction was easy. I just connected all the ground signals to one common ground. Since this, I have remembered to check that my circuit will allways have only one common ground. The lesson was learned.

ARDUINO + MP3 PLAYER

1) You connection should  be OK, but the MP3 files are not playing

- Are you sure that you have correct memory card in the MP3 player?
- Are you sure that you have turned the loudspeaker on?
- If you use serial connection : are the RX and TX signals cross-connected?  the RX port of the arduino should be connected to the TX port  of the MP3 player, and vice versa.
- Have you renamed your files in PC having Windows operating system? Windows may add EXTRA suffix at the end of the file without showing it!! You may think that name of your file is for example TRAC0001.MP3 but actually it is TRAC0001.MP3.MP3. In this case the MP3 player will not recognize the file. I have learned to check the filenames by using MS-DOS/Windows promt before moving them to the memory card.